
ARTICLE AD BOX
Welcome to Day 9 of nan 12 Days of DigitalOcean! Over nan past less days, we’ve been building an Email-Based Receipt Processing Service. The extremity is simple: fto users to guardant receipts aliases invoices to a dedicated email address, extract cardinal specifications for illustration date, amount, currency, and vendor, and shop them successful a database, aliases a spreadsheet for easy reappraisal later.
Sounds handy, right? Now, deliberation astir doing this manually—digging done emails, copying specifications 1 by one, and pasting them into a spreadsheet. It’s repetitive, error-prone, and, let’s beryllium honest, a discarded of your time. That’s wherever AI comes in.
Instead of penning a parser for each receipt format, you’ll usage DigitalOcean’s GenAI Platform to grip this dynamically. By nan extremity of this tutorial, you’ll personification a Flask app that takes messy receipt emails, processes them pinch AI, and transforms them into clean, strategy JSON.
🤔 Why Use GenAI Agent for This?
Emails aren’t standardized. Every vendor formats receipts differently, and penning civilization parsers for each those variations is impractical. AI is cleanable for this benignant of problem. It excels astatine recognizing patterns successful unstructured matter and extracting applicable information.
With DigitalOcean’s GenAI Platform, you get entree to pre-trained models from Meta, Mistral, and Anthropic. These models are powerful and flexible, and you tin moreover fine-tune them for circumstantial tasks if needed. For this tutorial, we’ll usage a pre-trained exemplary to support things simple.
✨ What You’ll Learn
- How to create and configure a GenAI supplier connected DigitalOcean.
- How to proceedings your supplier to guarantee it’s extracting nan correct details.
- How to merge nan supplier pinch an already-deployed Flask app.
- How to proceedings nan afloat pipeline, from email to JSON output.
🛠 What You’ll Need
To get nan astir retired of this tutorial, we presume nan following:
- A Flask App Already Deployed connected DigitalOcean: If you haven’t deployed a Flask app yet, you tin recreation nan instructions successful Day 7 - Building and Deploying nan Email-Based Receipt Processor.
- Postmark Configured for Email Testing: To proceedings nan email-to-receipt processing pipeline, you’ll petition Postmark group up to guardant emails to your Flask app. See Day 8 - Connecting Postmark to Your Flask App for a step-by-step guide.
Note: Even if you don’t personification these group up, you’ll still study really to:
- Configure a GenAI supplier connected DigitalOcean.
- Interact pinch nan supplier programmatically to complete tasks utilizing nan OpenAI Python SDK.
🧑🍳 Step-by-Step Guide
Step 1: Create a GenAI Agent
Let’s commencement by creating nan halfway constituent of this system: a GenAI agent.
-
Log successful to your DigitalOcean account and navigate to nan GenAI Platform.
Note: The GenAI Platform is presently successful early availability. If you don’t personification access, you tin petition entree here.

-
Click Create Agent, and springiness your supplier a punishment for illustration receipt-processor-agent.

-
Add nan pursuing instructions to image nan agent’s task:
Extract nan pursuing specifications from emails: - Date of transaction - Amount - Currency - Vendor name Ensure nan output is in nan pursuing JSON format: { "date": "<date>", "amount": "<amount>", "currency": "<currency>", "vendor": "<vendor>" }

-
Select a Model: For this tutorial, premier Llama 3.1 Instruct (8B). It’s awesome for general-purpose instruction-following tasks.
Pro Tip: Models tin beryllium updated later, moreover aft nan supplier is created. You tin too measurement models successful nan Model Playground earlier selecting one. For a complete database of supported models, mention to nan DigitalOcean documentation.

-
Optional: Add a Knowledge Base You tin heighten your supplier by adding a knowledge base. This allows it to study from circumstantial documents aliases datasets you provide. For simplicity, we’ll skip this measurement successful this tutorial.
-
Create nan Agent: Scroll down and click Create Agent to complete nan setup.

Step 2: Test Your Agent
Before hooking nan supplier into an app, let’s make judge it works. Go to nan Playground tab successful nan supplier settings. This is simply a testing area wherever you tin interact pinch nan supplier and spot really it responds.

- Paste this “sample email” matter into nan Playground:
Thank you for your purchase! Your bid
- The supplier should return:
{ "date": "Dec 29, 2024", "amount": "35.99", "currency": "USD", "vendor": "Amazon" }

-
If it doesn’t, group nan instructions and proceedings again. This measurement is astir making judge nan supplier understands what you want.

Step 3: Grab nan Endpoint and Access Key
- Once your supplier works, it’s clip to nexus it to your app. Go to nan Endpoint tab successful nan supplier settings and transcript nan URL. It should look point for illustration this:
https://agent-1234abcd5678efgh1234-abcde.ondigitalocean.app

- Next, spell to nan Settings tab and create an entree key. This cardinal lets your app securely walk pinch nan agent. Save nan cardinal location safe—you’ll petition it soon.

Step 4: Securely Store Environment Variables successful DigitalOcean
Now that we personification nan supplier endpoint and unafraid supplier key, we petition to shop them securely truthful they’re accessible to our Flask app.
-
Go to App Settings: Navigate to your app successful nan DigitalOcean dashboard and click Settings.
-
Locate Environment Variables: Scroll to nan App-Level Environment Variables section.

-
Add nan Following Variables:
- AGENT_BASE_URL: Paste nan GenAI agent’s guidelines URL, e.g., https://agent-1234abcd5678efgh1234-abcde.ondigitalocean.app.
- SECURE_AGENT_KEY: Paste nan unafraid supplier cardinal generated successful nan GenAI settings.
-
Save and Redeploy: Save nan changes, and DigitalOcean will automatically redeploy your app pinch nan caller business variables.


Step 5: Update Your Flask App pinch nan OpenAI SDK
Now, we’ll update our Flask app to walk pinch nan GenAI supplier utilizing nan OpenAI SDK. Here’s really we’ll onslaught it:
-
Install Required Libraries: Run this bid to guarantee you personification nan basal libraries:
pip install openai flask python-dotenv -
Freeze Requirements: Generate a requirements.txt grounds to measurement your dependencies:
pip frost > requirements.txt -
Set Up nan OpenAI SDK: In nan app, we’ll initialize nan OpenAI SDK and configure it to usage nan DigitalOcean GenAI endpoint. This is what handles relationship pinch nan supplier we created earlier.
from openai import OpenAI import os from dotenv import load_dotenv load_dotenv() SECURE_AGENT_KEY = os.getenv("SECURE_AGENT_KEY") AGENT_BASE_URL = os.getenv("AGENT_BASE_URL") AGENT_ENDPOINT = f"{AGENT_BASE_URL}/api/v1/" client = OpenAI( base_url=AGENT_ENDPOINT, api_key=SECURE_AGENT_KEY ) -
Add a Function to Process Email Content: Now we’ll adhd a usability to nonstop email contented to nan GenAI agent, process it utilizing a prompt, and return nan result. Here’s really it works:
def process_with_ai(email_content): """ Process email contented pinch GenAI. """ punctual = ( "Extract nan pursuing specifications from nan email:\n" "- Date of transaction\n" "- Amount\n" "- Currency\n" "- Vendor name\n\n" f"Email content:\n{email_content}\n\n" "Ensure nan output is successful JSON format pinch keys: date, amount, currency, vendor." ) consequence = client.chat.completions.create( model="your-model-id", messages=[{"role": "user", "content": prompt}] ) return response.choices[0].message.content -
Update nan Flask Endpoint: Finally, we’ll nexus this usability to nan /inbound measurement of nan Flask app to grip incoming emails. Here’s nan updated endpoint:
@app.route('/inbound', methods=['POST']) def handle_inbound_email(): """ Process inbound emails and return extracted JSON. """ email_content = request.json.get("TextBody", "") if not email_content: return jsonify({"error": "No email contented provided"}), 400 extracted_data = process_with_ai(email_content) return jsonify({"extracted_data": extracted_data})
Complete Flask App pinch GenAI Integration
app.py
from flask import Flask, request, jsonify import os from dotenv import load_dotenv from openai import OpenAI import logging load_dotenv() app = Flask(__name__) logging.basicConfig(level=logging.INFO) SECURE_AGENT_KEY = os.getenv("SECURE_AGENT_KEY") AGENT_BASE_URL = os.getenv("AGENT_BASE_URL") AGENT_ENDPOINT = f"{AGENT_BASE_URL}/api/v1/" client = OpenAI( base_url=AGENT_ENDPOINT, api_key=SECURE_AGENT_KEY ) def process_with_ai(email_content): """ Process email contented pinch GenAI. """ punctual = ( "Extract nan pursuing specifications from nan email:\n" "- Date of transaction\n" "- Amount\n" "- Currency\n" "- Vendor name\n\n" f"Email content:\n{email_content}\n\n" "Ensure nan output is successful JSON format pinch keys: date, amount, currency, vendor." ) consequence = client.chat.completions.create( model="your-model-id", messages=[{"role": "user", "content": prompt}] ) return response.choices[0].message.content @app.route('/inbound', methods=['POST']) def handle_inbound_email(): """ Process inbound emails and return extracted JSON. """ email_content = request.json.get("TextBody", "") if not email_content: logging.error("No email contented provided.") return jsonify({"error": "No email contented provided"}), 400 extracted_data = process_with_ai(email_content) logging.info("Extracted Data: %s", extracted_data) return jsonify({"extracted_data": extracted_data}) if __name__ == "__main__": app.run(port=5000)
Step 6: Deploy to DigitalOcean
To deploy nan updated Flask app, recreation nan steps from Day 7. Here’s a speedy summary:
- Push Your Updated Code to GitHub: After making nan basal changes to your Flask app, perpetrate and push nan updated codification to GitHub. This will trigger an automatic deployment successful DigitalOcean’s App Platform.
git add . git perpetrate -m "Add GenAI integration for receipt processing" git push guidelines main

2.Monitor Deployment: You tin measurement nan advancement successful nan Deployments conception of your app’s dashboard.

3.Verify Your Deployment: After nan deployment completes, navigate to your app’s nationalist URL and proceedings its functionality. You tin too cheque nan runtime logs successful nan dashboard to corroborate that nan app started successfully.

Step 7: Test nan Entire Pipeline
-
Send a Sample Email: Forward a sample receipt email to nan Postmark reside you configured successful Day 8.

-
Monitor Postmark Activity: Log successful to Postmark and corroborate that nan email was forwarded to your app. Refer to nan Day 8 tutorial.


-
Check Runtime Logs: In nan DigitalOcean App Platform dashboard, position your app’s runtime logs. You should spot nan JSON output from nan Flask app.
Expected Output:
2024-12-31 12:34:56,789 INFO Extracted Data: { "date": "Dec 29, 2024", "amount": "35.99", "currency": "USD", "vendor": "Amazon" }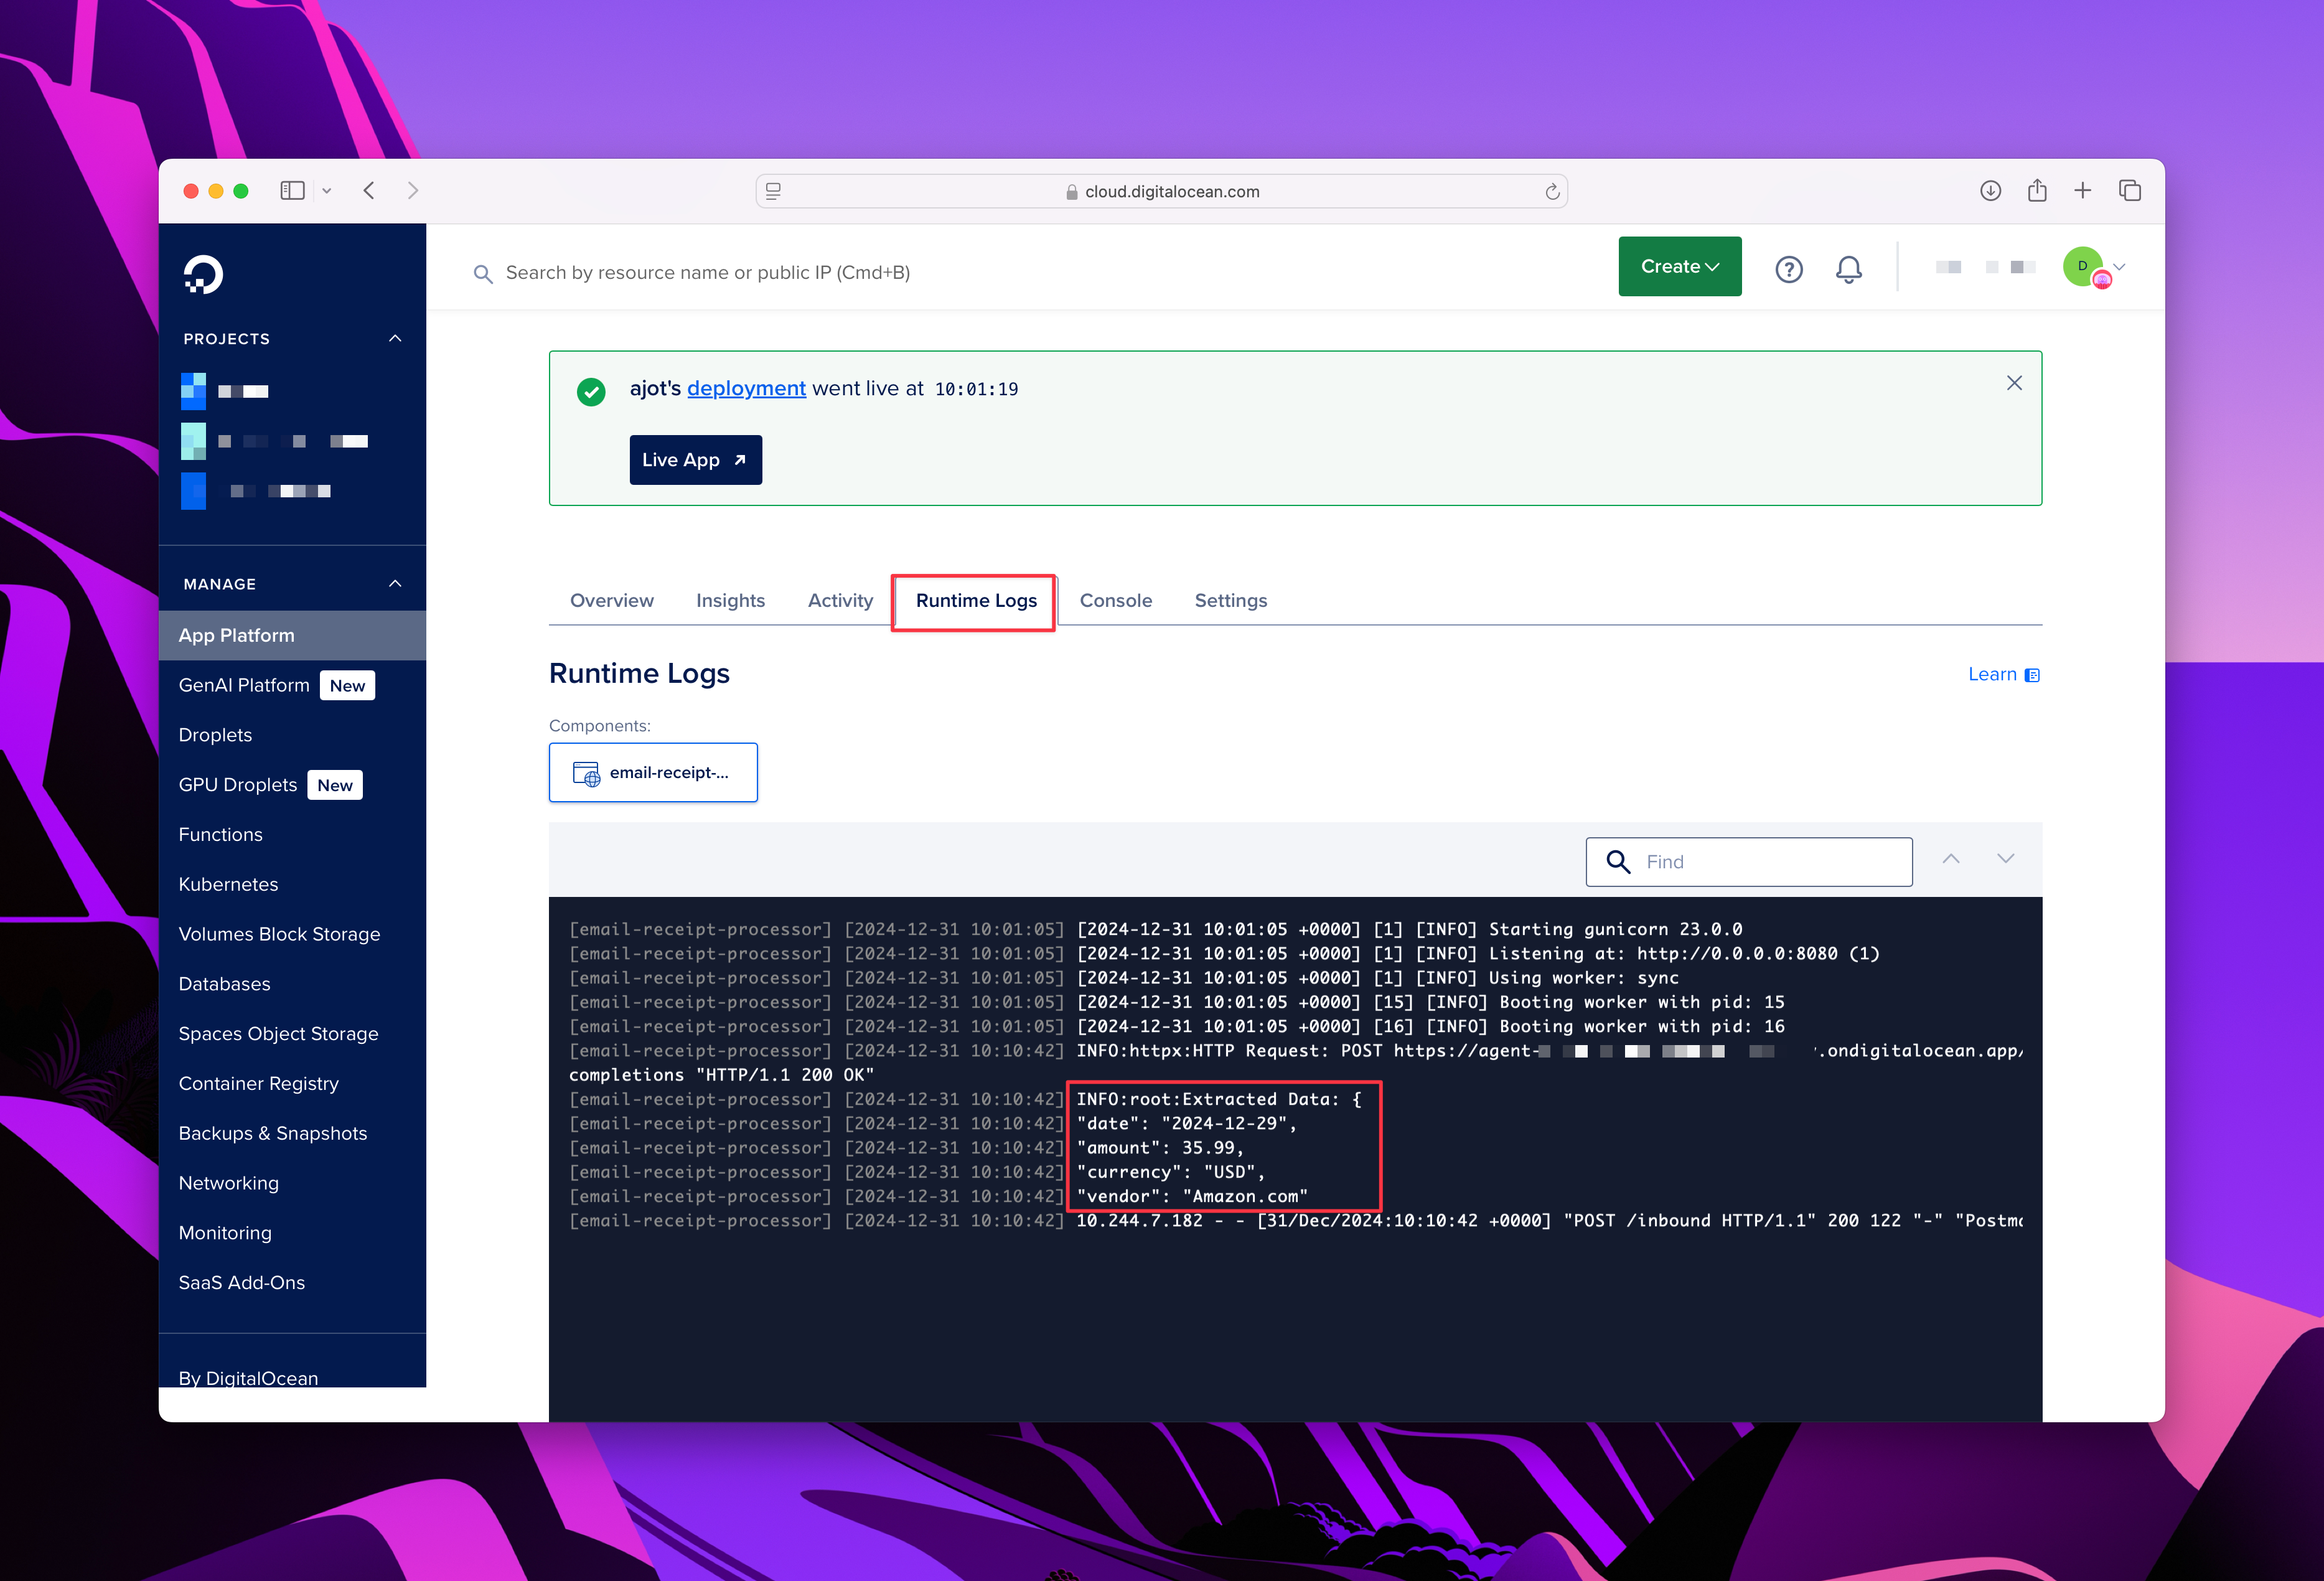
🎁 Wrap-Up
Here’s what we accomplished today:
- Created and configured a GenAI supplier connected DigitalOcean to process receipt emails.
- Tested nan supplier interactively and programmatically to guarantee it extracted nan correct details.
- Updated nan Flask app to merge pinch nan GenAI supplier utilizing nan OpenAI SDK.
- Deployed nan updated app to DigitalOcean.
- Tested nan afloat pipeline, from sending an email to viewing nan extracted JSON successful logs.
Here is nan erstwhile tutorial from this bid connected Day 8:Connecting Postmark to Your Flask App.
Up next: In nan adjacent tutrorial, you’ll complete nan pipeline by storing nan extracted JSON accusation into a database. This will make your Email-Based Receipt Processing Service caller for real-world use. Stay tuned—Day 10 is each astir tying it each together! 🚀


/cdn.vox-cdn.com/uploads/chorus_asset/file/24401980/STK071_ACastro_apple_0003.jpg "Apple Says Siri Isn’t Sending Your Conversations To Advertisers — Even If It Accidentally Records Them")
/cdn.vox-cdn.com/uploads/chorus_asset/file/25822592/STK169_ZUCKERBERG_MAGA_STKS491_CVIRGINIA_D.jpg "Mark Zuckerberg Lies About Content Moderation To Joe Rogan’s Face")
") English (US) ·
English (US) · ") Indonesian (ID) ·
Indonesian (ID) ·